Most of us in the northern climes dread the arrival of the "Valley of the Long Shadows." The sun creeps its way south, the frost glistens on the lawn, and we must ride our Barcolounger. You know, the one with the two speed gearbox, one down and one up. The TV remote is the only start button we get to push. Many complain that the Valk is HOT in the foot area to ride during summer. But you and I know that there is a good amount of air that passes under that engine. When that air gets below 40°, our feet get COLD! With these little puppies, made for only $1.00, your feet will stay toasty, and you will welcome the heat that comes from those big Valkyrie jugs because it will not be swept away by the draft under the engine. And, to be honest, they are not all that unattractive. They are shaped for maximum protection and minimum drag, that's drag on the ground or drag from the air. Tested to 130 MPH without mishap and my pegs hit the ground on turns before these wings do (in fact, I have never dragged them and have been running them for some time now).
Foot Fairings
TIME: 1 hour (plus locate the parts)
MATERIALS
S-10 Chevy Truck Bug Shield (or equiv)
4 8" heavy wire ties
|
TOOLS
hack saw or band saw
drill bit 1/4" (Forstner bit is best)
sandpaper 400 grit & 120 grit
wire clippers or scissors
(optional - polishing wheel with compound)
|
The simple explanation is: Make foot fairings out of the ends of your bug deflector. The deflector is one of the shaped ones that you see on the hoods of pickup trucks, SUV's and other vehicles which bolts under the hood and curves around the front. Cut to length, drill some holes and wire tie it on. The only problem you may have is finding a bug shield. Here's some hints to get one cheap: Five finger discount (not recommended ;-), auto bone yard, actually buy a new one ($39.95), or, here's how I got mine -- Call your local truck dealer and ask the used car guy that handles trade-ins where he gets his trade-ins detailed. Go to that shop and look in the dumpster. Unbelieveably, when someone trades in a truck with a bug shield on it, the dealer wants no part of it if it is not absolutely perfect so he tells the detail shop to remove it. They normally just toss it. If you ask nice, they may save you one or two of them. I asked my detail guy for S-10 Chevy smoked bug shields because they have extended wings beyond the mounting area and match the lines of the Valk's crash bars. There was one in the dumpster that day and he called me no less than three days later with another. Good guy to have for a friend. Buy him some Dunkin Donuts!
Before we begin, you should know that these are general instructions. This is the method that I used to consruct these little puppies using the materials I had on hand and using the S-10 Chevy Deflectors. Since you may be using different deflectors with different dimensions, your measurements may vary. I used the "backyard mechanic" method to invent and construct these useful items and if you use that method as described here, you should have no troubles making a set of these for yourself using just about any deflectors. I can also tell you that these work so darned good that if I did not find a source of a bug shield for free, I would not hesitate to purchase one to make these.
CLICK FOR A LARGER PICTURE....
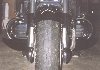 First, cut our bug deflector ends off. Since I used S-10 Chevy's, I cut off the ends about 8˝" from the end of the mounting area (the flat part that went under the hood with the holes or sticky tape on it), not from the end of the wing. Your cut here may vary, but what you should do is measure from about ˝" outside the part of the bar where the arm that goes under the head is welded to 1˝" beyond the bolt where your crash bar is bolted near the engine. It's easy to cut the shield gently with a fine toothed hack saw since they are typically soft and flexible.
Once you've cut them, hold them in place so that the mounting end is about ˝" beyond the welded bar mentioned. Take a marker and mark the underside of the shield on both sides of the bar that goes back under the header. Mark the shield where it would mount on the pick up truck (where the sticky tape was or the holes are). Then, mark the underside of the shield on each side of the frame where the crash bar is bolted on. Remove the shield. At the marks drill Ľ" holes into the shield. It's best to use a Forstner bit here since a regular bit may crack the plastic. Sometimes, the original hole in the shield will work just fine so you don't need to drill one there. I drilled four holes on each piece, one set for the crash bar outside part and one for the part where the crash bar bolts to the frame. However, I have only wire tied the outside ones since the rad hose holds the clutch side piece in place and there is enough tension on the brake side piece to keep in it place (the wind helps too). You may be able to do just the outside holes.
If you wish, now is the time to dress up the cut ends of your foot fairings. Sand the edges with 120 grit sandpaper or a sanding drum. Shape the corners here so they look good. Move to 400 grit dry and sand some more. Wet the 400 and sand some more. If you want a really good finish on the shield, you can use a linen buffing wheel with jewlers rouge to make it shine.
Before you put your shield in place, insert your wire ties first from the underside through the hole you drilled and loop over to the other hole (original or new). While holding your shields in place, fish the wire tie ends so that they feed on either side of the frame (in the center) first and zip them up about halfway (I don't use these inside ties at all, as noted above). Then, fish the ties around the bar that goes under the head and zip them about halfway. Push your new foot fairings back against the crash bar and zip up the all wire ties! Ahhhhhhhhh! Warm feet at last! And, by golly! She looks good, too!
HINT: What if your feet get too warm? You may ask, "It's below 50°! When would that be?" With these Feet Heeters, it can happen when riding in the city some and even on the highway. Just install a set of highway pegs and hang your feet outside the protected area, or point your toes toward the ground to gather up some cold air. You'll pull them in soon enough to warm them back up.
 Chetspages@rattlebars.com