Pages maintained by Rattlebars
Mfg. Support our affiliates! Click above!
|
The information on these pages is accurate to the best of the author's knowledge. The author can assume no responsibility for the use or misuse of this information by the reader. The reader is expected to secure any other information needed from Service Manuals or other sources. It is up to the reader to determine his/her ability to make any modifications noted. If the reader does not feel qualified he/she should enlist professional help. |
If only they
could see my horn!
The Saga of Horny Lights
By Chet Walters
based on an idea by VALKMAN in south carolina VOA# 961
This should work on any bike‡,
these instructions are for Honda Valkyrie

CAUTION:
THIS MOD MAY BE ILLEGAL IN YOUR STATE†. CHECK WITH YOUR
STATE LAW
ENFORCEMENT AGENCY BEFORE PERFORMING THIS MOD. USE AT
YOUR OWN RISK. |
VALKMAN sent me an
e-mail in which he stated that he was riding in heavy traffic
with his thumb poised alternately over the hi/lo switch for the
headlight and the horn button. Which to implement to gain the
attention of cage drivers in a bad situation? The idea occurred
to him, "What if... you could make some visual clue in
conjunction with the horn beep?" Interesting idea, but you
either need two thumbs, or a way to wire it up.
So, I tried it with the high
beam. It was easy to do with a standard relay (if you don't
understand how or why we should use a relay, see Installing
Extra Horns for a very
basic explanation). But it was unsuccessful for three reasons. One:
the filament of the high beam takes about a second to warm to
full intensity, which caused the flicker of the light to NOT
coincide with the beep of the horn. Two: With both the
high beam and the low beam filament lit, the contrast when the
high did reach intensity was minimal, and barely noticeable in
daylight, with the short pulse of the horn. Three: Flashing
headlights or auxiliary lamps in traffic may not be such a good
idea after all. Why? Because, a common signal used in traffic to
let another driver know that it is OK for him to proceed (i.e.
"Go ahead, make your left turn in front of me, I will
wait.") is the flashing of headlights on and off. Maybe not
wise. You will certainly get the attention of the other driver,
but that driver may just think that you are telling him to go
right ahead and pull out in front of you. Precisely the OPPOSITE
of what we were trying to accomplish.
In fact, with
or without this mod in place, flashing your headlight to gain the
attention of another driver is a poor idea. It may be
mis-interpreted by other drivers as stated above. Every truck
driver on the road knows what flashing headlights mean. "You
go right ahead and pull in front of me." That particular
question is even on our motorcycle permit written test here in
Ohio, as my 17 year old daughter reminds me. If you mark it yes,
you get it wrong. If you do wish to gain the attention of another
driver with your headlight, switch its state only ONCE.
That is, go from lo to hi or from hi to lo. Please don't
repeatedly flicker your light to get attention in traffic.
I have tried blinking different
lights with this mod, from the headlamp high beam, Cobra light
bar, my auxiliary fog lamps to switching the lo beam off and
lighting up the hi. They are all relatively easy to wire up using
these parts. I settled on flashing only the turn signals. Instead
of saying something to cagers that may be mis-interpreted, it
says "hazard!" all around the bike. You can even
"beep" the horn at someone behind you, a tailgater
perhaps. I will describe only that wiring because of the reasons
stated above. I do not recommend that you blink any other lights
with this mod. Even just blinking the turn signals may be illegal
in your state, so I don't even recommend that you do this either,
unless you want to impress folks at shows or ride in parades and
blink your lights and beep your horn with only one button. When
you ride in traffic on highways, switch them off, please.
CAUTION:
THIS MOD MAY BE ILLEGAL IN YOUR STATE†. CHECK WITH YOUR
STATE LAW
ENFORCEMENT AGENCY BEFORE PERFORMING THIS MOD. USE AT
YOUR OWN RISK. |
LIGHT UP YOUR
HORN
flash all four signals in conjunction with the horn
TIME: 50 minutes
COST: $5.78 plus tax
MATERIALS
DPDT 12VDC PC RELAY (Radio Shack Cat# 275-249a $3.99)
16-20 gauge wire
1 SPST toggle or rocker switch ($1.79)
5 splice-in wire connectors (blue plastic variety)
weather resistant electrical tape
|
TOOLS
Phillips screw driver
soldering iron
forceps as heat sink/clamp
wire cutters
wire strippers
|
 QUICKLY FOR THE EXPERT: Supply a
key on +12V through the relay to both signal circuits when
triggered, while keeping them ISOLATED when not triggered which
requires a DPDT relay (see FOUR WAYS for FIVE BUCKS! for the reason why). Activate the relay
with the +12V horn wire.
QUICKLY FOR THE EXPERT: Supply a
key on +12V through the relay to both signal circuits when
triggered, while keeping them ISOLATED when not triggered which
requires a DPDT relay (see FOUR WAYS for FIVE BUCKS! for the reason why). Activate the relay
with the +12V horn wire.
NOTE: this can be
accomplished without a relay by using a pair of 3 AMP
diodes/rectifiers (RS 276-1144) to power the two signal circuits
with the single horn hot wire. This has two drawbacks: 1) It may
overload the horn circuit and burn the switch (if you already use
a relay to blow the horn, use diodes to run the signals, it's
easier. Run them off the power out 87 terminal) (see below) 2)
the diodes tend to heat up when powered for long periods. For a
drawing of how to do this if you use a relay for your horn, check
our Horn Relay page and see the drawing below.
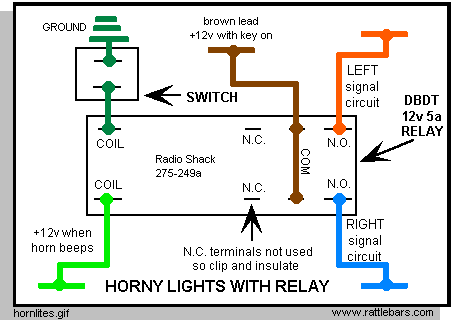
QUICKLY FOR MOTORHEADS:
See the drawing. The horn wire triggers the relay which then
feeds current to the signal lamps. The lamp circuits revert to
isolated when the relay is "off".
NOTE: this is a
"layman's" drawing which shows only the terminals on
the various parts. It is intentional that there are no electronic
symbols included.
FOR THE REST OF US:
Prepare for installation by pre-soldering your relay with five
inch pigtails. Solder five inches of wire (18-20 gauge) one each
to the four terminals at each corner of the relay. In the drawing
these are both COIL terminals and both N.O. [Normally Open]
terminals. Clip and insulate the N.C. [Normally Closed]
terminals, since they are not used. Solder a heavier lead (16-18
gauge wire) to BOTH the COM terminals, bridging them together.
Wrap the relay in such a way that these terminals will not come
in contact with anything else or each other. NOTE: when
soldering, use the forceps to clamp the wires to the base of the
narrow terminals and solder at the top end. The forceps serve as
a heat sink to keep you from damaging the relay. This may or may
not be necessary, but it is good practice when heating miniature
electronic components.
In the following, wires and parts
referred to by color etc. will vary according to the bike onto
which you are installing. Here, we will describe the method to
install this onto a Honda Valkyrie for color match wires and
other parts.
Disconnect the negative battery
terminal as a precaution at this time. Remove your headlight rim
by removing the phillips screws located at 4 o'clock and 8
o'clock on the rim. Placing your hand on the top of the rim to
hold it in place, pull outward on the bottom of the rim to
release. Holding the rim, unplug the headlamp and set the rim
aside. Loosen the clips that hold the harnesses in place.
Get +12v from the horn hot
wire
On the right side as you face the open Valkyrie nacelle, find the
large RED
connector (located about
2 o'clock). There are nine wires in that plug. Locate the LIGHT CELERY GREEN wire which is in one of the corners of
the plug. That is your horn wire, the one that goes
"hot" when you beep the horn. You will likely have to
peel back some of the loom tape to get enough wire to hook into.
With a connector, hook into this wire with either of the coil
pigtails (one coming from the lonely terminals on the end of the
relay).
Using a switch
A switch is NOT optional. There are times when you don't want to
have your lights blinking with the horn. It may be interpreted as
"impersonating an emergency vehicle" in some states
which is illegal. You may need to pass inspection and this would
cause to you fail. I suggest that you mount your switch to break
the ground, which is the wire we hook up in this step. This
minimizes shorting risk, and prolongs the life of the switch.
Figure out where you want to mount the switch, run enough wire to
reach it, and put the switch between this next pigtail and the
connection described.
Hook to ground through the
switch
Locate any DARK
LIME GREEN wire (there
are several) inside the headlight. Hook the other lonely coil
terminal to that wire, which is ground, through your switch.
Tie into the signal circuits
Hook the other END terminals of the relay to your signal
circuits, one each side. On the Valkyrie, locate the SOLID ORANGE wire, which is connected with a bullet
connector, and hook one of the other END terminal pigtails to
that. Locate the SOLID LIGHT BLUE wire, which is connected with a bullet
connector, and hook the other END terminal pigtail to that. Make
sure you hook to the SOLID color wires and not the wires with
white strips down them. Keep these isolated from each other.
Supply current to the signals
Now you need to hook the remaining pigtail (the one that bridges
both terminals) to a wire that is +12v hot with the key on. For
the Valkyrie, find a SOLID BROWN wire. There are several in there to
choose from.
Perform the smoke test
Everything OK? Lights light up with the horn? Believe it or not,
you're NOT done! Not yet, anyway. Test your turn signals. If they no longer work properly, you've
used the wrong relay or you've crossed the wires that we needed
to keep isolated. If it all works ok, both your signals and new
horny lights, then button her up. Impress your friends in your
driveway Then switch them off and go for a ride.
 |
OPTIONAL IF YOU ALREADY USE A
RELAY
do not
use off the horn button
If you already have
supplemental horns and beep them with a relay, you can
optionally use Radio Shack diodes (RS 276-1144). Just
solder up as shown and use a switch so you can turn them
off for the reasons given. It is not necessary to add a
relay as shown above. Click the pic for a printable version |
 |
FOR THE GL 1800 GOLD WING
Although the effect is not as striking on the
GL 1800 because there are so many relays in the circuit, this will
indeed put some horny lights on the 1800 wing.... click the pic for a
better printable view of the drawing..... |
 |
HORNY AUX LAMPS
I'm still no fan of blinking the headlight with the horn, but after considerable mileage with this circuit which is more noticeable than "Horny Lights" I'm a believer in blinking your AUX
Lamps with the horn. They can be fog lamps, light bars or any up front aux lamps
that you already work with a relay (NOT YOUR
HEADLIGHTS!).
This little circuit knows if your aux lights are on and will blink them off when the horn beeps. This little circuit knows if your aux lights are off and will blink them on when the horn beeps.
About $5 total..... you can use a standard 5 pin Bosch style relay or what I used, a Radio Shack micro 12v relay for a computer (275-241 which is only about half
an inch square). Diodes can be little 1 amp jobs (RS 276-1102) since you're only pushing relay triggers.
[Click
for the 275-241 relay.] -- [click
for the diodes] |
CAUTION:
THIS MOD MAY BE ILLEGAL IN YOUR STATE†. CHECK WITH YOUR
STATE LAW
ENFORCEMENT AGENCY BEFORE PERFORMING THIS MOD. USE AT
YOUR OWN RISK. |
† In
keen awareness of the international forum into which this article
is published, the word "state" is used in lieu of
province, country, principality, canton, territory etc.
Substitute any word which may apply in your case.
‡ This mod can be performed on any modern
motorcycle which employs the same circuitry: a wire that goes hot
when the horn is beeped and isolated left and right signals.
Questions? Contact
Chet at  Chetspages@rattlebars.com