Pages maintained by Rattlebars
Mfg. Support our affiliates! ...!
|
The information on these pages is accurate to the best of the author's knowledge. The author can assume no responsibility for the use or misuse of this information by the reader. The reader is expected to secure any other information needed from Service Manuals or other sources. It is up to the reader to determine his/her ability to make any modifications noted. If the reader does not feel qualified he/she should enlist professional help. |
Shims, Springs
and other Carb things
By Chet Walters †
Some exhaust
modifications will make the Valk run lean in the midrange.
Midrange lean can be corrected with new jets, but that is a lot
of work and requires tools and talent. However, midrange flat
spots can be lessened with little effort and expense requiring
only a few tools (just a phillips screwdriver if you're careful).
What you can do is add a shim or two to raise the main jet
needles. It's so easy it should take you only 20 minutes or so.
(But you really should re-jet, since shims are a qwik fix). If
you have a Standard/Tourer, you can replace the springs with a
set from an Interstate. And/Or you can replace the needles with a
"needles only" jet kit. We will describe how to do each
here for you.
MATERIALS
3 options
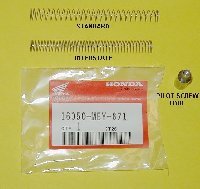
Assorted washers Radio Shack Part #64-3022
Interstate springs for
use in Standard Honda Part# 16050-MBY-671
Pro Dyno Needles only Jet
Kit Part # V6000-01
|
TOOLS
Phillips screw driver
(one that fits the soft screws of the caps EXACTLY)
only if you raise the tank will you need:
10mm socket
12mm socket
Needle nose pliers for needle clips |
Click any picture to see
enlargement
Click resuting picture to see next
Use backspace key for previous |
|
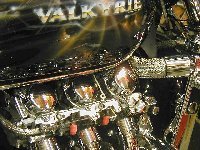 |
STEP ONE: Remove
choke linkage cover
Three screws, one up top between the front and second
carb and two on the side of the linkage cover. |
 |
STEP TWO: Remove
the choke linkage
You can get away with not removing the linkage
if you raise your tank. But, it's easier to get
everything lined up and there is less danger you will pop
a diaphragm or miss a seal if you pull the linkage. Be
careful of the springs and washers. Note how they are
oriented before you remove them. |
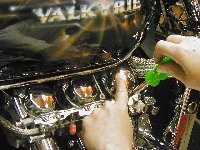 |
STEP THREE:
Remove the carb top screws
Take your time here. Remove the top two screws (near the
tank) and then hold the carb top in place as you remove
the bottom last screw. Use a #2 phillips. These screws
are soft! Before you turn loose of the carb top cover,
see the pic below of what to expect. |
 |
STEP FOUR: Carb
top is a two piece item
Remove the carb top and be careful of the spring
inside. If you have pulled the choke linkage, these are
easier to get off. Make sure they are clean and free of
dust and dirt. |
 |
STEP FIVE: Remove the
spring
Carefully remove the spring. Try not to bend or
kink or stretch it. These springs need to match to keep
all six of your carbs working properly. |
 |
STEP SIX
(alternate): Using Interstate springs on a Standard
Many folks have had success by changing to
Interstate springs from the Standard kind. This enhances
throttle response in the mid range. IS springs are
shorter but with more coils. Used in conjunction with
shims or new needles, this makes for a nice mod for only
about $12.If
you're just swapping out springs, skip to STEP ELEVEN.
|
 |
STEP SEVEN: Pull
the slider straight out
Take one of the screws that held on the carb top
and screw it into the needle holder a few turns. Pull the
slider straight up and out. Be careful of the needles and
jets. You can harm performance by just putting a little
nick or scratch in a needle or a jet. Your bike will run
very badly if you damage the diaphragm |
 |
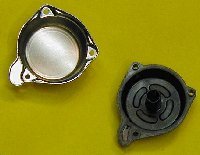
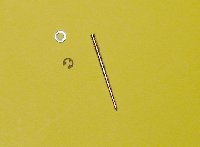
STEP EIGHT
(alternate): Pop the holder out of the slider and
(alternate) install shims
Wiggle and pull the screw that you inserted in
the holder and pull out the holder. Shown here are the
parts of the assembly. Inside the holder is another
smaller spring but it should not dislodge. The stock
setup comes with one shim already. If you are just adding
shims, then grab a matching washer from the assorted
washer bag and re-install the needle with the original
washer and one of your washers (for .020) or two of your
washers (for .040) or more. Re-install the keeper,
pushing all the way down until it clicks. Skip to STEP
TEN. |
 |
STEP NINE
(alternate): Changing needles
One can change the needles by using a
"needles only" jet kit. All that you change is
your needles, not your jets. This requires that you also
adjust the pilot screw. Follow the instructions that came
with the needle kit. These needles have a steeper taper
than the stock ones. The same cautions apply. If you
damage a needle, you are Toast! These pricey kits come
with just enough parts to do the job. Don't lose a single
washer or retainer. The supplied washer goes above if the
retainer and the stock washer goes below the retainer.
Install the needle and re-install the keeper, pushing all
the way down until it clicks. Many recommend putting the
clip in the second slot on stock bikes. |
 |
STEP TEN:
Install the slider
Invert the diaphragm (make a little "umbrella"
out of it). Put the slider back in the carb. Here, the
diaphragm will hit the top of the carb before the needle
goes into the jet. Be gentle. Remember you don't want to
mar the needle or the jet. Tip the top of the slide
slightly toward yourself to drop in the needle, then
straighten it up to seat the diaphragm. The diaphragm
must seat properly, or you'll have a vacuum leak and
unbalanced carbs (ouch). |
|
STEP ELEVEN:
Install the spring and button up
Push the slider down keeping the diaphragm in the groove.
Install whichever spring you are going to work with and
replace the carb top. Repeat for all six carbs. |
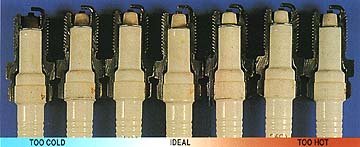
To see if you are
running lean or rich, check the color of your plug insulators
after running a tank or two. Though the picture above is for heat
range comparisons, it matches rich and lean for the most part.
Your plugs should look like the center one. For more information
on pugs, NGK has a nice write up here.
More plug pictures here with lots of info.
My Valk plugs after 30,000 miles
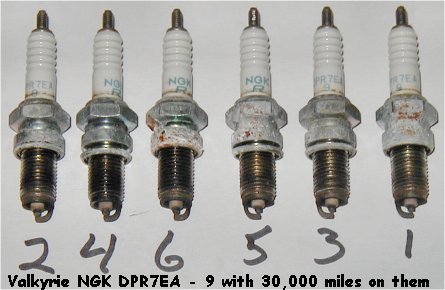
click pic for larger view.
Making a Pilot
screw tool from a radio antenna
Remove the intakes and
cover the head holes with tape to avoid stuff getting in there.

Where the Pilot screw is located.
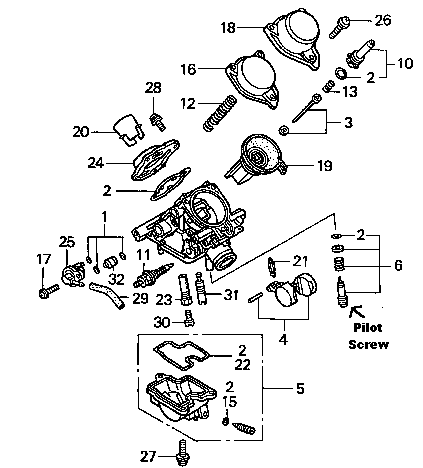
Screw all the way in gently and unscrew 2.25 turns and try it
out. Unscrew ¼ turn each time to futher adjust.
†
This article was written after working from a FAQ found on the Valkyrie Owners Association web site. Thanks go out to Rikki
Dee who alerted me to the IS spring mod some time ago and to
Hondatek who detailed it first, I believe. I added springs some
time ago and just recently (May of '01) added the needles only
jet kit that I had sitting around for a year or so. I'm not sure
of the improvement the needles only will do for you if you have a
stock exhaust, but by adding the needles and putting three more
disks in my Trapps (making 8 each) I love the "fat"
feel of the throttle now for sure!
Questions? Contact
Chet at  Chetspages@rattlebars.com